Tuesday, March 27, 2012

#IACPNYC Bound!

For the next week, we're headed to New York City to attend the IACP conference, as well as spend a day at the CIA, eating our way through restaurants and visiting my former chefs. I'm so excited to get off island and travel to NY with my husband, and we're ready to meet friends and eat some delicious foods!

I've worked with Jackie of The Diva That Ate NY, in the Social Media Committee, and it's been such a great experience connecting with Twitter friends. Looking forward to meeting both her and Judith, our fearless leader, at the conference! Other friends that will be there are Michelle of Sweet & Simple, Elizabeth of Asian in American, and SO many more!

Screen Shot of the IACP website

Looking forward to attending some sessions, as well as the Book and Blog Festival! You can follow the conference tweets by checking out the Twitter hashtag #IACPNYC. I'll be live tweeting and possibly blogging during the conference, so watch my tweets for updates! See you in New York!

Below I'm adding some of the events open to the public during the conference, so if you're in the area, make sure to stop by and say hello! (Excerpted from IACP Press Release)

IACP Book + Blog Festival – The country’s largest gathering of leading food writers, cookbook authors
and bloggers takes place Sunday, April 1, 1:30 – 4:30 pm at 82 Mercer St. Meet leading authors
including Karen Page & Andrew Dornenberg, Melissa Clark and Alice Medrich, or discover dozens of new
ones at this festive afternoon of books, music, and freebies. Tickets, $10, available at https://kiosk.eztix.co/kiosk/4891

White House Chefs Move to Schools Culinary Workshops – Michelle Obama’s initiative to end
childhood obesity by pairing chefs with schools joins the weekend lineup with Food Network star Ellie
Krieger and White House pastry chef and cookbook author Bill Yosses hosting half day workshops on
Sunday, April 1, at 82 Mercer St. Topics range from running a school cooking class on a shoe string, to
food policy on kids, to funding healthy eating from garden to table to classroom. Tickets, $40, available
for morning and afternoon sessions, at https://kiosk.eztix.co/kiosk/4984

“School” Lunch with Chef Bill Telepan - Chef Bill Telepan infuses culinary magic to whip up a luncheon
feast, using nutrition and budgetary guidelines, to show how good public school lunch can be. The
fundraiser on Sunday, April 1 at 12:15 pm, at the French Culinary Institute, benefits The Culinary Trust,
Wellness in the Schools and Future Cooks Initiative. Guests will dine at communal tables. Tickets, $35,
may be purchased at https://kiosk.eztix.co/kiosk/4984

Today's Special - One Night Only - The Culinary Trust hosts a pop up restaurant based on Aasif Mandvi's
feel-good foodie film Today's Special. The menu is planned by cookbook author Madhur Jaffrey, who
stars with Aasif Mandvi in the film, and will make welcoming remarks. Sunday, April 1 at L'Ecole, 462
Broadway. Tickets, $150, for seatings at 5:30 and 8:30 pm, may be purchased at https://kiosk.eztix.co/kiosk/4984

Monday, March 26, 2012

Etsy Showcase: Paradise Sweets

One of my favorite things about social media is being able to share new cookbooks, ingredients, and culinary trends. Today is a special day since I am sharing a brand new Etsy shop launched last month (February 2012) by one of my friends, the talented baker Aubrey A'ea. We met while studying at the CIA, and Aubrey was always the detail-oriented baker and you can definitely see that this attention to detail is showcased in her shop, Paradise Sweets!


Located on the island of O'ahu, specifically in Honolulu, Aubrey crafts these Paradise Sweets with the freshest ingredients available, making sure that the flavors are perfect! And after making the delicate sugar cookie, she decorates each and every one with a sugar icing coating and can personalize them to your liking. Just look at the camera cookies below! Have a photographer in your life with a sweet tooth? These would be perfect gift and can be shipped right to their door!


"Paradise Sweets products are baked and decorated fresh to order and shipped out from HAWAII! Everything is made from scratch with local, quality ingredients. You will taste sweet sunshine in every bite!" -Aubrey

Cooking with Books had a chance to catch up with Aubrey and ask her some questions about baking, small businesses, and her favorite cookie! 
Cooking with Books: What's you favorite treat to bake and eat?
Aubrey from Paradise Sweets: Favorite thing to bake and eat would have to be... Snickerdoodles. That's what I grew up baking with my mom and grandmothers. There is nothing better than smelling the sweet cinnamon and then eating them hot and fresh! Plus it's a nice trip down memory lane! 
 Cooking with Books: Any advice for bakers wanting to start their own online shop?
Aubrey of Paradise Sweets:
  • Take pictures of everything you make. Everything. At a brick-and-mortar bakery, you can sell based on smell alone. On the Internet, you've only got pictures and your words. Make it good, then make it LOOK good. 
  • Experiment with what works best. Use natural lighting, interesting backgrounds, and add color if your baked goods are brown or off-white (as most cookies are!). Write down notes when you do things differently, so you can remember. 
  • Do research on what other shops are selling, but be unique. I'll often look around for cookie inspiration but I try to make things different and my own. I'm thrilled when I can't find any inspiration because it really forces me to be creative!
  • Test out your shipping practices. Do research on pricing, then send things out to someone you trust to give you honest feedback. Were things broken? You need more padding. Tasted stale? Use better, air-tight packaging. Looked unprofessional? Consider dressing it up a bit. I sent out test packages to California and NY, noted the time it took to get there and the state they arrived in.
  • Always always always make extra. In case something breaks, doesn't turn out right, or you just *need* to do a taste test. I'll always put in a couple extra cookies.
  • Don't worry if the sales don't start right away. It takes time. Get some local sales under your belt too. Ask people you know to hand out your business cards or spread the word. A lot of my business comes from word-of-mouth. And guess what, that's free!


Thanks Aubrey for the fantastic tips and we wish you the best in this new venture! And readers, I can vouch for these cookies: they're perfectly decorated, with a sweet icing and a buttery sugar cookie. Oh and they shipped from Hawaii to Martha's Vineyard and not one cookie suffered a break!

Order some cookies for a loved one today: Visit Paradise Sweets on Etsy
Connect with Aubrey and Paradise Sweets: Like Paradise Sweets Facebook Page

Sunday, March 25, 2012

Silent Sunday: Roasted Grapes

Roasted Grapes. Sweet globes, enhanced with Niagara Ice Syrup. This post is a short post to tease you into some other recipes that will soon be coming up on here using Niagara Ice Syrup. 

Before & After
Roasted Ice Syrup Grapes

1 bunch of red grapes

  1. Preheat oven to 400F.
  2. Wash and remove stems from the grapes. Pat dry and place on sheet tray.
  3. Drizzle Cabernet Fran Ice Syrup over grapes and toss lightly.
  4. Roast for 30 minutes. Cool and store in airtight container in the fridge.
  5. Uses: toss in salad, serve alongside roasted pork, or better yet, with a slice of pound cake and whipped cream. The possibilities are endless!

Disclaimer: Post sponsored by Niagara Ice Syrups. No monetary compensation was exchanged. Opinions based on my personal testing and tasting.

Friday, March 23, 2012

The Hunger Games: Strawberry Bread

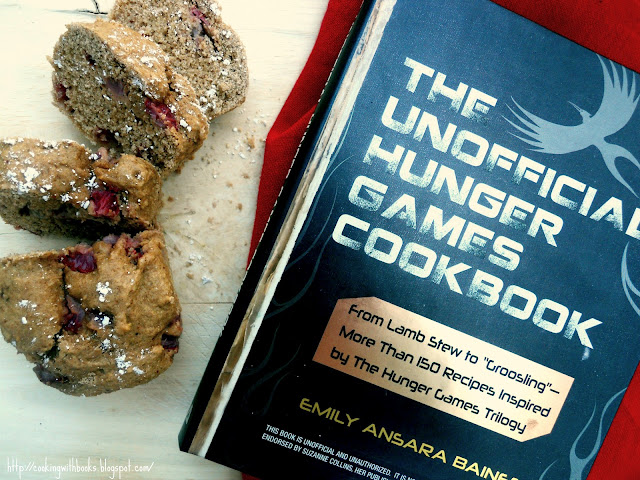
The Hunger Games. If you haven't heard, read, or lived them, then you must be living on another planet! The Hunger Games are a three-part series of books by Suzanne Collins. The first book, I read in less than 48 hours. The second book, I was wait listed at the library for the longest week of my life and when I got my hands on it, I tried to space it out and read it in a week. The last one...I just couldn't space out and read it in about 3 days. So when I heard there was "The Unofficial Hunger Games Cookbook" by Emily Ansara Baines, I knew I had to have to, cook from it, and then share with you all!

Thanks to the folks over at F+W Media, this book reached me just in time to post on the day that The Hunger Games movie premieres in most movie theaters. Of course, living on the Vineyard has its downfall and movies don't premiere at the same time as the entire nation, so I will sadly not be watching this movie today, but hopefully soon enough!

The book is filled with recipes for almost, if not all, the dishes in the books. Some of the chapters include recipes for:
  • Mrs. Everdeen's Breakfast of Mush
  • Cheesy Meaty Hash Brown Casserole
  • French Bread from the Mellark Family
  • Peeta's Cinnamon Bakery Bread
  • Prim's Sweet Goat Cheese Salad
  • Rue's Roasted Roots
  • Plutarch Heavensbee's Roast Wild Turkey
  • Tigri's Fig Cookies
After flipping through the book and reading the author's inventive recipe creations, I settled on making the Opportunistic Strawberry Bread, not only because berries have such great meaning in the original books, but because I've never made Strawberry Bread!

Made with whole wheat flour and no artificial sugars, this bread is fantastic as a breakfast loaf! The fresh berries lace it, creating small pockets of berry explosion. I had some freeze-dried strawberries, which I pulverized and added to the batter before baking to amp the strawberry flavor. It's a rustic looking bread that is a perfect vessel for a slathering of cream cheese or to eat as is, so definitely give this recipe a try!


Opportunistic Strawberry Bread

It’s likely that Katniss isn’t the only one aware of the mayor’s penchant for strawberries. In fact,
Peeta’s father, perhaps recognizing an opportunity to support his family, probably makes this yummy
strawberry bread specifically to sell to the mayor!
(The Hunger Games, Chapter 4)

Makes 1 loaf

¼ cup honey
¼ cup (½ stick) butter, melted
1 egg, beaten
1½ cups whole wheat flour
3 teaspoons baking powder
1 cup strawberries

  1. Preheat oven to 325°F. Grease a 9" loaf pan.
  2. Add honey and butter to beaten egg and blend.
  3.  Put flour and baking powder in a large bowl and make a well in the center.
  4. Pour in egg mixture and add strawberries. Blend well.
  5. Pour into greased loaf pan and bake about 1 hour. Bread is done when toothpick inserted in center comes out clean. 
  6. Cool 10–15 minutes before removing from pan.
Share with us: Are you a Hunger Games fan?  Tag your tweets with #UnofficialHG and share with @adamsmedia!

    Wednesday, March 21, 2012

    Marshmallow Madness!

    After you make your first homemade marshmallow, you will NEVER go back to those artificial ones that come in a plastic bag! And after you get your hands on Shauna Sever's new cookbook all about marshmallows, you might spend endless weeks making marshmallows in all shapes, colors, and flavors! 

    Marshmallow Madness!, recently released on Amazon and bookstores in your city, is by Shauna Sever and printed by Quirk Books; she is best known for her delicious blog "Piece of Cake".  Her approachable personality and simple recipes create confidence in first time bakers. She'll bring you in with her casual and knowledgeable voice, and take you step by step, in this case, in making the best tasting marshmallows you've ever tasted!


    When I received my review copy of Marshmallow Madness!, my hands started squishing the puffy book. Creatively bound in puffy material and a book cover filled with colorful mallows, it invites you to peruse its pages and find just the right recipe for you. I decided to recreate her Key Lime Pie Marshmallows, light green mallows with bright lime flavor and added crunch with a sprinkling of graham cracker crumbs.


    A dessert all in itself, these marshmallows are the type of creative genius you'll find in her book. Other recipes I'll be trying: Malibu Marshmallows, Maple-Bacon Marshmallows, and her Mango-Chile-Lime Marshmallows! Also, you can check out #marshmadness and see what other bloggers made!

    Thanks to the generous folks at Quirk Books, today I'm sharing Shauna's Classic Vanilla Marshmallow recipe, a great starting point for those making marshmallows for the first time. Mastering this recipe will let you experiment with more flavorings by adjusting the extracts you add! But that's not all! Like I said, Quirk Books are really generous tweeps and are giving away THREE puffy copies of Marshmallow Madness to three Cooking with Books readers. Scroll down to enter!

    Classic Vanilla Marshmallows
    Reprinted with permission of Quirk Books from "Marshmallow Madness" by Shauna Sever, 2012
    Makes: About 2 dozen 1 1/2-inch mallows

    THE BLOOM
    4 1/2 teaspoons unflavored powdered gelatin
    1/2 cup cold water

    THE SYRUP
    3/4 cup sugar
    1/2 cup light corn syrup, divided
    1/4 cup water
    1/8 teaspoon salt

    THE MALLOWING
    2 teaspoons pure vanilla extract
    1/2 cup Classic Coating plus more for dusting

    Lightly coat an 8-by-8-inch baking pan with cooking spray.

    WHISK TOGETHER the gelatin and cold water in a small bowl and let soften for 5 minutes.

    STIR TOGETHER the sugar, 1/4 cup of the corn syrup, water, and salt in a medium saucepan over high heat. Boil, stirring occasionally, until the temperature reaches 240°F. Meanwhile, pour remaining 1/4 cup corn syrup into the bowl of an electric mixer fitted with the whisk attachment. Microwave gelatin on high until completely melted, about 30 seconds. Pour it into the mixer bowl. Set the mixer speed to low and keep it running.

    WHEN THE SYRUP reaches 240°F, slowly pour it into the mixer bowl. Increase the speed to medium and beat for 5 minutes. Increase to medium-high and beat for 5 more minutes. Beat on the highest setting for 1 to 2 minutes more and beat in the vanilla; the finished marshmallow will be opaque white, fluffy, and tripled in volume. Pour it into the prepared pan, using an offset spatula to smooth it into the corners. Sift coating evenly and generously over top. Let set for at least 6 hours in a cool, dry place.

    Use a knife to loosen the marshmallow from the edges of the pan. Invert the slab onto a coating-dusted work surface and dust it with more coating. Cut into whatever size pieces you wish (a pizza cutter works great for squares). Dip the sticky edges of the marshmallows in more coating, patting off the excess.

    Variation: Super vanilla-ize these mallows by adding a scraped vanilla bean or dab of pure vanilla bean paste along with the vanilla extract.


     Marshmallow Madness Giveaway!


    To enter, leave ONE comment on this post telling me your DREAM marshmallow flavor. The comments are the official entry, there is no purchase necessary, void where prohibited. Three (3) winners will be chosen randomly. Prizes will be shipped by publisher. The contest ends Sunday, March 25th, 2012 at 11:59 pm Eastern. The winner will be announced on Monday March 26th. 

    Disclaimer: Quirk Books sent me a review copy of this book, but I was under no obligation to review or host giveaway.

    Tuesday, March 20, 2012

    Tex-Mex Butternut Squash Soup

    Today's post is short and sweet because I want you to get out and enjoy the FIRST DAY OF SPRING!! Can you tell I'm extremely excited?! It's cause I am. I'm ready to say goodbye to winter, and this soup is the farewell. It might just been the last comforting, warm soup you'll see on the blog for a while. I'm ready for cold soups, salads, sandwiches, and lobster rolls! I'm ready for feeling gritty sand between my toes and the warm sunshine on my face. So, are you ready to say goodbye to winter with me? Keep reading!

    This soup fulfills that craving, layering sweet potato, earthy squash, constant heat from dried habanero, and starts off with a great mirepoix. You can use homemade stock or store bought, whichever you have on hand. Why Tex-Mex? I have no clue. What makes a dish Texan-Mexican? Just because I added hot peppers, corn chips, hot sauce...it might not be real Tex-Mex, but it's close enough for me!


    Tex-Mex Butternut Squash Soup
    Makes 6-8 servings
    2 tablespoons olive oil
    1 medium yellow onion, peeled and chopped
    2 small carrots, peeled and chopped
    2 celery stalks, chopped
    2 liters stock (chicken, beef, or vegetable)
    1 dried habanero pepper

    1 small butternut squash, peeled, seeded, and chopped
    1 small sweet potato, peeled and chopped
    salt & peppers to taste

    Garnishes: Cheese, Blue Corn Chips, Hot Sauce

    1. In a medium sauce pot,  heat olive oil and add onions, carrots, and celery. Make sure they are consistent in size, but shape does not matter, as everything will be pureed. 
    2. Cook until onions are translucent. 
    3. Add stock and dried whole habanero pepper (you can omit this for less heat). Simmer for 10 minutes, until it comes up to a slow boil. 
    4. Add squash and sweet potato. Cook for 20-30 minutes, until tender. Season with salt and pepper. Taste! Remove the dried habanero. If not, it will get pureed and be overwhelming in the soup.
    5. Using an immersion blender or regular blender, puree the soup while hot. Transfer back to pot and slowly simmer until ready to serve. Re-season if needed.
    6. To serve: Serve in deep bowls and top with your favorite cheese, blue corn chips for color and hot sauce for another layer of flavorful heat. 

    Share with us: How do YOU say goodbye to winter? 

      Monday, March 19, 2012

      Maple Persimmon-Caramel Drops

      It's Maple Monday!!! Virtual Potluck wanted to get in on the sugaring time, where maple sap flows freely and maple growers are busy collecting it, reducing it, and making it into what we know as maple syrup and sugar! When I received maple sugar from Coombs Family Farms, I knew I wanted to make a "healthier" baked good. Maple Sugar, you ask? I found this site that explained how to make three types of maple sugar, which could definitely be a fun experiment to try in 2012. This particular sugar came from the folks over at Coombs Family Farm, and not only do I love it, but I love their commitment to sustainability and tradition. They express it better here:
      Since the mid-1800’s, the Coombs family has been acting as responsible stewards of the forest, following a ‘sustainable’ approach to agriculture long before anyone had a specific name for it – or could conceive of any other way to farm. As part of a fabric of nearly 8000 maple farmers who are all preserving maple forests and keeping land free from sprawl, Coombs Family Farms is doing more than making maple. We are helping to preserve crucial habitat for thousands of distinct plants and animals that need large intact tracts of forest to survive.
      When deciding what to make, I settle on a combination of flavors: persimmon, caramel and maple. These started out as cookies, but when eventually baked and tasted, I decided to call them drops. M. said I should call them sweet breakfast scones, and I while do think they resemble scones a little,  I hate calling something like this such a traditional name. 

      Imagine a soft but dense muffin top, dotted with caramel bits and laced with a slightly sweet maple flavor. How did the persimmon pulp come to be an ingredient in this? We had two uber-ripe persimmons in the fridge and needed to use them, so why not add some extra fiber and health into these "drops"? The persimmon flavor isn't too intense, with slight undertones of fruity sweetness. Head on over to Thyme in Our Kitchen and check out the round-up of recipes!


      Maple Persimmon-Caramel Drops
      Adapted from Eat, Live, Run's Persimmon Spice Cookies

      2 small, ripe persimmons, peeled
      1/4 cup butter or shortening
      2 1/2 tablespoons maple sugar
      1 teaspoon vanilla extract
      1/2 egg, beaten
      1/2 cup all purpose flour
      1/2 cup white whole wheat flour
      1/2 teaspoon baking soda
      1/2 teaspoon baking powder
      1/3 cup caramel bits

      1. Chop and puree the persimmons. Reserve. 
      2. In a medium bowl, cream together butter, vanilla and maple sugar. Add the egg.
      3. Mix in flour, baking soda, baking powder and reserved persimmon pulp. Fold in caramel bits.
      4. Refrigerate dough for 1 hour. Preheat oven to 350F degrees and grease a baking sheet. 
      5. Cookie dough will still be very moist, so scoop 1 tablespoon portions onto baking sheet.
      6. Bake for 15 minutes, until caramel starts to melt and drops appear golden brown. 
      7. Serve with butter or jam, warm out of the oven. 
      This were a delicious and healthy treat, perfect for breakfast or as an afternoon snack with fruit preserves. Want to learn more about maple syrup and sugar? Connect with Coombs Family Farms on Facebook and head on over to their website to learn more about the craft of sugaring.
        Disclaimer: Coombs Family Farm kindly sent me maple products to recipe test with. No monetary compensation was exchanged and all opinions are 100% based on my personal testing.

          Friday, March 16, 2012

          The Lodge Cast Iron Cookbook: Irish Soda Bread & Giveaway!

          This week is a lucky week for you readers! I couldn't control myself and have not one but TWO fantastic giveaways for you this week. The first one was the True Lemon giveaway, so make sure to enter that one. The second one, I just couldn't resist. Nothing says St. Patrick's Day more than a loaf of Irish Soda Bread, so that's what we're sharing today. And not just any Irish Soda Bread recipe, but one from the brand new "The Lodge Cast Iron Cookbook published by Oxmoor House. Scroll down and you can enter this weekend only giveaway!

          Although I am a newbie to cooking in cast iron, it's something that's been around for MANY years and is now luring even more cooks, bought home cooks and restaurant chefs, to cook in cast iron. Lodge Manufacturing is the ONLY domestic manufacturer of the cast iron pan! Unbelievable that they've been making "America's Original Cookware ™ " since 1896. Well, what is better to accompany great cookware than a great cookbook to go with?

          The Lodge Cast Iron Cookbook not only features 200 recipes and photographs from cookbook authors and chefs, but is a sort of scrapbook of memories for those sharing their recipes with us. Alongside most recipes is a small memory about the dish, who inspired it, and how long it's been in their family.


          Other great chapters in this book includes one of the most important things about cast iron: how to care for it, renew, maintain, and cook from it for many years to come. This has been one of my ongoing studies because I started seeing rust on my pan lately. After reading the book, I took care of reasoning my pan with some fat and heat in the oven, and it's perfectly seasoned again.

          You'd think cast iron is limited, but this book showcases the wide range of items you can cook and bake in it. Some chapters are: Breakfast, Cooking Outdoors, Cornbread (an entire chapter on it!), Desserts, Breads, and more. Today we're baking in my cast iron skillet and it's a delicious Irish Soda Bread!


          Maggie Doherty’s Irish Soda Bread
          Reprinted with permission from Oxmoor House

          Maggie Doherty was cookbook author Peggy Fallon’s mother, who swore by cast iron when it came to her soda bread.   Makes one (9-inch) round loaf
          4 cups all-purpose flour
          3 tablespoons sugar
          1 teaspoon baking soda
          1 teaspoon salt
          2 cups raisins (preferably 1 cup
          each golden and dark raisins)
          2 cups buttermilk
          1 large egg, lightly beaten
          ­1.     Preheat the oven to 375°. Generously grease a 9-inch cast iron skillet with vegetable shortening.

          2.     Combine the flour, sugar, baking soda, and salt in a large bowl; whisk gently to blend. Stir in the raisins to coat with the flour mixture. Make a well in the center and add the buttermilk and egg; stir until a stiff dough forms. (Use a wooden spoon if you must, but the most efficient way to mix this soft, sticky dough is with floured hands. Alternatively, the dough can be mixed in a heavy-duty stand mixer fitted with the dough hook.)

          3.     Remove the dough from the bowl and mound it into the prepared skillet, roughly forming a round loaf. (Don’t be concerned that it won’t hold its shape; it will be corrected during baking.) Lightly moisten your hands with water to smooth the top. Using a serrated knife dipped in fl our, score the top with a large X, about 1⁄2-inch deep. (This will ensure even baking, and it will also scare away the devil, according to Peggy’s mother.) Bake until the loaf is golden brown with a firm crust and the bottom sounds hollow when tapped with a knife, about 1 hour.

          4.     Remove the bread from the skillet and let cool on a wire rack at least 30 minutes before cutting into 1⁄2-inch-thick slices. Serve warm, at room temperature, or toasted, with or without butter.

          Giveaway: Want to start cooking with Cast Iron?
          Thanks to the generous folks over at Oxmoor House and Lodge, we have a great giveaway prize for one winner! You'll receive a copy of The Lodge Cast Iron Cookbook and a 12-inch Cast Iron Skillet from Lodge. See below on how to enter.


          How to Enter (please leave a separate comment for every action done.)
          The comments are the official entry, there is no purchase necessary, void where prohibited. One (1) winner will be chosen randomly. Prize will be shipped by sponsoring company, US mailing addresses only. The contest ends Sunday March 18th, 2012 at 11:59 pm Eastern. The winner will be announced on Monday March 19th. This post is sponsored by Oxmoor House, and as always opinions are basely solely on my testing (and tasting!). No monetary compensation was received.

          Wednesday, March 14, 2012

          Orange-Lemon Loaf & True Lemon Giveaway

          The one thing that keeps me going through the winter? The vastly available citrus. Oranges, Lemons, Limes, Grapefruits, Tangelos, Clementines, and more! They add tartness to desserts, they brighten up a simple loaf cake, and ultimately just make winter bearable.

          Welcome to the Virtual Potluck and True Lemon #citruslove! 
          What's True Lemon you ask? True Lemon products are basically the essence of citrus fruits, dehydrated and converted into powder form. All True products are 100% natural with no artificial ingredients or sweeteners, preservatives,sodium or gluten. True Lemon's ingredients are the same as found in a lemon: Citric Acid, Lemon Juice, Lemon Oil and Ascorbic Acid (Vitamin C).

          This is a fantastic product to have around the house, not only for making drinks and cocktails, but as an added flavoring to your baked goods, as well as marinades, sauces, and seasonings in cooking.

          True Lemonades comes in Original Lemonade and Raspberry Lemonade. True Unsweetened & Naturally Sweet products include: Lemon, Orange, and Lime. They also come in handy shakers, perfect for shaking on guacamole!

          After having developed a few recipes with the True Lemon products, my latest favorite is this Orange-Lemon Pudding Loaf, a perfect treat made with white whole wheat flour, a touch of sugar, fresh orange slices and laced in the batter, True Lemon.


          Orange-Lemon Pudding Loaf
          Makes 1-2 mini-loaves

          1/2 cup white whole wheat flour
          1/3 cup granulated sugar
          1/2 teaspoon baking powder
          1/8 teaspoon salt
          3 packets of True Lemon
          1/3 cup milk
          1 tablespoon vinegar
          1 large egg
          2 tablespoons vegetable oil
          1 teaspoon vanilla extract
          1 orange, peeled and sliced

          1. Preheat oven to 350F.
          2. In a bowl, whisk together all the dry ingredients.
          3. Whisk milk and vinegar in a small bowl and let sit for 5 minutes. Add egg, oil, and vanilla extract.
          4. Add wet ingredients to dry. 
          5. Grease a mini loaf and layer orange slices on the bottom. Pour batter into mold and bake for 25 minutes. Serve with a side of whipped cream.


          Would you love to try True Lemon products in your own kitchen? Well you're in luck, because each and every one of us is giving away a True Lemon gift set that includes a box each of True Lemon, True Lime, True Orange, True Grapefruit, True Lemonade, True Raspberry Lemonade, True Lemon shaker, True Lime shaker and a t-shirt. Each and every of the following Virtual Potluck bloggers will be giving away the same awesomely citrus prize pack, so make sure to visit them as well:

          Citrus Tea with Hibiscus and Goji Berries by Diabetic Foodie
           Spicy Lime Shrimp & Citrus Pickled Red Onion Salad by Cookistry
          True Lemon Panna Cotta with Pontchatoula Strawberries by Bite and Booze
          True Citrus Zing Salad Dressing by Groovy Foody
          Lemon Pudding Cakes with Raspberry Sauce by Thyme In Our Kitchen
          Lemon Biscotti by Tara the Foodie
          Quick Cinnamon Scrolls with Orange Fondant Icing by Farmgirl Gourmet
          Guacamole & Shrimp Cocktail and a Key Lime Pie by 30AEATS  


          Giveaway Rules and How to Enter (leave a separate comment for each action done!)
          • Check out the True Lemon site and share what's one thing you learned.
          • Follow True Lemon on Twitter
          • Follow Virtual Potluck on Twitter
          • Follow Cooking with Books on Google Friend Connect
          • Tweet the following message: Join #citruslove by entering to win a gift box thanks to @TrueLemon and @VirtualPotluck! Enter to win:http://bit.ly/zpQbqz
          The comments are the official entry, there is no purchase necessary, void where prohibited. US mailing addresses only. One (1) winner will be chosen randomly. Prize will be shipped by True Lemon. The contest ends Sunday, March 18th, 2012 at 11:59 pm Eastern time. The winner will be announced on Monday, March 19th via email and will have 48 hours to respond before a new winner is chosen. 

          Disclaimer: This post is sponsored by True Lemon, and as always my opinions are based on personal recipe testing (and tasting!) No monetary compensation was exchanged.

          Sunday, March 11, 2012

          All Quinoa: Pasta & Polenta

          If you haven't heard, seen, taste or felt what Quinoa is...here's a crash course! The culinary world that has been overtaken with quinoa love; the same world that slowly but surely is turning towards whole grains. Cookbooks, magazines, television shows, radio programs and every single other media outlet mentions it at least once a day, in the shape of recipes, new blog posts, or new products.

          Pronounced keen-wah, quinoa is known as the "Mother Grain" and is considered one of the healthiest grains available to us. Originating in the Andean region of Ecuador, Colombia, Peru and Bolivia, it was once an accesible crop that fed this nations. Now, with all the media attention that quinoa is getting, fewer locals in these countries can now afford it. Hopefully a balance can be reached and we can all share the wealth! 

          One of the companies that's best doing this is The Quinoa Corporation, who brought the first 50 lb bag of quinoa into the United States. Through their own brand, Ancient Harvest Quinoa, they offer a wide variety of products that I had the opportunity to test out and play around with. You can purchase their pastas, quinoa grain, and polenta in their online store. Here are my favorite two recipes: Quinoa Pasta in an Herb & Mushroom Sauce and a Sausage Ragu over Quinoa Polenta.


          Quinoa Pasta in Herb & Mushroom Sauce
          Searing the chicken breast seals in juices and by roasting it, you'll have an anything but dry breast. This sauce thickens up through evaporation of the liquid, with no need to add extra thickeners. If you'd like to quickly thicken it, add 1 tablespoon of cornstarch mixed with 2 tablespoons of water. 
          Serves 4

          1 pound quinoa pasta
          salt

          2 tablespoons olive oil
          1 medium onion, chopped
          4 boneless chicken breasts

          1 cup mixed dried mushrooms
          1 cup hot water
          2 cups full-fat cream

          to taste: salt, pepper, fresh cilantro

          1. Preheat oven to 400F degrees.
          2. Boil quinoa pasta in enough salted water. Drain and reserve. 
          3. In a heavy bottom saute pan, heat olive oil and saute chopped onion for 2 minutes. Sear two chicken breasts and season on both sides with salt and pepper. Roast in oven 15-25 minutes, until the juices are runny clear. 
          4. In the meantime, hydrate dried mushrooms in hot water. Do NOT drain the water, reserve it for the sauce. 
          5. Once the chicken breasts are done, rest on cutting board and return pan to the heat. Cut the other 2 chicken breasts into medium dice and add to pan of drippings, as well as dried mushrooms (water included). Cook until water is halfway evaporated and whisk in cream. Simmer over medium low heat. 
          6. Toss pasta in cream sauce. Slice chicken breasts on a diagonal and serve atop sauced pasta. Decorate with fresh cilantro and enjoy!


          Linguica Sausage Ragu over Quinoa Polenta
          Serves 2
          This is a quick and simple dinner for two when you want dinner to be served and on the table in less than 30 minutes. Searing the quinoa polenta gives it added texture but you can also throw the slices in the microwave to heat through. 

          4 linguica sausage, with casing removed
          1/2 red bell pepper, chopped
          1/2 medium yellow onion, chopped
          1 can whole peeled tomatoes
          1/2 tablespoon sugar
          salt and pepper to taste

          4-6 slices of quinoa polenta
          1 tablespoon butter

          1. In a hot cast iron pan, crumble sausage and sear for 2 minutes. Add chopped pepper and onion and cook until translucent. Add tomatoes and let simmer for 20 minutes. Season with sugar, salt and pepper. 
          2. To serve, slice 1/2 inch thick slices of quinoa polenta and sear in hot butter. Serve with ragu on top and cheese. Top with fresh basil if available.
          Disclaimer: Quinoa Corporation provided quinoa products to make this post possible. As always, all my opinions are 100% my own and based on personal recipe testing and tasting!

          Friday, March 9, 2012

          Brown Sugar, Coconut & Chocolate Bars

          As a baker, you can lure friends with treats. You can bake and have someone fall in love with the smell drifting from the oven. Better yet, you can barter with your treats! On Martha's Vineyard, we've formed communities. Online Facebook communities to help summer people get housing, groups for selling and buying, groups for sharing daily photos of the Vineyard. How does this come into play with these delicious bars? Let's just say I bought a chair and bartered to have it delivered in exchange of these treats (and some extra marshmallows!)

          These bars are from Easy Does It: Winners & Favorites by Patti Roper and it's a cookbook filled with traditional Southern recipes including Pimento Cheese, Creole Catfish, Peach Muffins, and these Brown Sugar bars. Simple ingredients that should always be in your baking cabinet, make these treats a delight to share with friends!


          Brown Sugar, Coconut & Chocolate Bars
          Published by Quail Ridge Press
          Yield: 9 thick bars*

          2⁄3 cup butter, softened
          2 cups packed brown sugar
          2 eggs
          2 cups all-purpose flour
          1 teaspoon vanilla
          ½ teaspoon salt
          ½ teaspoon baking soda
          1 cup mini chocolate chips
          1 cup shredded, sweetened coconut

          1. Preheat oven to 350 degrees. Mix all ingredients except chocolate chips and coconut. (These were mixed by hand with a dough whisk!)
          2. Press half the dough into greased, and foil covered pan (this one is 8 by 8 inches).
          3. Sprinkle mini chocolate chips. Roll the other half of the dough to fit on top and press down.
          4. Sprinkle with shredded coconut.
          5. Bake 30 minutes, until coconut is toasted and bar is fully baked. Cool for an hour or overnight for clean cuts.
          *This recipe could yield 18 bars if made in a larger pan! The smaller the pan, the bars result thicker than expected, allowing you to layer the chocolate and coconut, creating a chewy and rich bar!


          What would be three ingredients in YOUR dream treat bar?

          Wednesday, March 7, 2012

          Hazelnut Chocolate Molten Cakes from La Tartine Gourmande

          When I received "La Tartine Gourmande" by Béatrice Peltre, (or actually, when I picked up my mail and saw that I had received it!), I had been walking around Edgartown and decided to settle in for a coffee and a browsing of this gorgeous cookbook. To be honest, I spent the next hour sipping on my Mocha Latte and reading this book. I was enthralled by her words and the colors, styling, and simply delicious food made me hungry for more than a coffee. 

          Béatrice Peltre is the author of the award-winning blog, LaTartineGourmande.com and this cookbook is  living proof that we eat through our eyes. Béatrice captures the brightness in fruits and vegetables, with the earthy tones of whole grains, making you just want to reach into the book and have a bite!

          As her contents read, her recipes are "to inspire", and as I flipped through, I left a post-it in every recipe I wanted to try. More than half I can assure you. So how was I going to narrow down a recipe to make for the blog? I asked my husband of course! Ultimately it came down to the Beet and Quinoa Tabouli (which you can check out the link and see how Brian from A Thought for Food did it!) and these Hazelnut Chocolate Molten Cakes. Yeah, the quinoa didn't really stand a chance against warm, unctuous chocolate.

          With the permission of the folks over at Roost Books in Boston, I'm sharing this recipe with you below. I've already made it three times (small batches), and one of the times used Almond Meal instead of Hazelnut flour, and it still worked out beautifully! Scroll below the recipe and enter to win a copy of "La Tartine Gourmande!


          Hazelnut Chocolate Molten Cakes with Fleur de Sel
          Excerpted from LA TARTINE GOURMANDE by Béatrice Peltre, (c) 2012.  
          Published by arrangement with Roost Books, an imprint of Shambhala Publications, Inc., Boston.  

          Makes 4 to 6 cakes, depending on the size
          You will need: four ¾-cup ramekins or six 2/3-cup ramekins

          6 tablespoons (85 g; 3 oz) unsalted butter, plus more for the molds
          Flour of your choice, to dust the molds
          4 oz (115 g) dark chocolate (70% cocoa)
          2 large eggs plus 1 egg yolk
          ¼ cup (50 g; 1 ¾ oz) blond cane sugar
          ½ teaspoon fleur de sel
          1 teaspoon pure vanilla extract
          3 tablespoons (22 ½ g; ¾ oz) hazelnut or millet flour
          1 oz (30 g) hazelnut-flavored chocolate, cut into 4 pieces
          Confectioners’ sugar, to dust


          Preheat the oven to 450ºF (230ºC). Butter the ramekins, then coat them with flour and tap the excess out. Melt the dark chocolate and butter in a bain-marie (see Basic Cooking Techniques, page 27, for instructions).

          In the bowl of a stand mixer, combine the eggs with the sugar and fleur de sel and beat until the batter has tripled in volume and is light and pale in color; this will take about 8 minutes. Add the vanilla and fold in the flour, then the melted chocolate-butter mixture, making sure to keep the batter light each time.

          Divide three-quarters of the batter among the ramekins and add one piece of hazelnut chocolate at the center of each mold. Cover with the rest of the batter. At this point, if you want, you can refrigerate the cakes until you are ready to bake and serve them. If you do, bring them back to room temperature before baking.

          Place the cakes in the oven and bake for 10 to 12 minutes (if you bake 6 cakes, they tend to need 10 minutes only); remember that the less time you bake the cakes, the more gooey the inside will be. Remove from the oven and leave them to rest for 5 minutes. Flip them swiftly onto dessert plates or serve them directly in the ramekins. Dust with confectioners’ sugar and serve. A scoop of whipped cream or ice cream served with the cakes is a nice touch too.


          "La Tartine Gourmande" by Beatrice Peltre Giveaway!
          To enter, visit La Tartine Gourmande blog and leave a link to your favorite recipe there. The comment is the official entry, there is no purchase necessary, void where prohibited. One (1) winner will be chosen randomly. Prize will be shipped by publisher WORLDWIDE. The contest ends Sunday March 11th, 2012 at 11:59 pm Eastern. The winner will be announced on Monday March 12th.

          Monday, March 5, 2012

          The Buffalo Guys: Bratwurst & Ricotta Ravioli

          Have you ever had Buffalo? Before trying these sausages from The Buffalo Guys, we hadn't either! When Virtual Potluck was contacted by The Buffalo Guys, we were thrilled to say the least. Read below for more information and the recipe I developed, but remember to head over to our host site, Diabetic Foodie, for aa round-up of all the recipes!

          Two of the things I loved the most about these sausages were:
          1. They contain no fillers, MSG, nitrites or nitrates
          2. Buffalo are range-raised without antibiotics or growth hormones
          The buffalo are raised to roam freely in farms and ranches in Kansas, Colorado, Wyoming, Nebraska, and Montana. Here are some of The Buffalo Guys beliefs:
          • We believe that animals should be treated with dignity.
          • We believe the environment can be renewed through wise use.
          • We believe that what we produce for others to eat should be equal in quality to what we, ourselves, choose to eat at home.
          • We support the growth of "Organic and Sustainable" agricultural practices and feel that the American Buffalo fits this well.
          • We believe that our employees and member ranchers should be fairly compensated for their efforts and in so doing be empowered to enjoy a full and fruitful life.
           All of this made me want to create a recipe that showcased the sausage in a canvas that would bring out the natural flavor. Using a neutral cheese like ricotta (you could also use cottage cheese), and just adding the sweetness of cooked onions, this pasta filling will make any dish shine.

          The Buffalo sausage used in this filling is Bratwurst, considered by most as the German soul food! Spiced with pepper, nutmeg, mace, and coriander, this sausage is flavorful and lean. It's also gluten-free, uncured, and skinless. Check out the recipe below for some Italian-inspired German soul food! We served these Bratwurst ravioli with a celery sauce and sprinkled with paprika, hearty and delicious!


          Buffalo Sausage & Ricotta Filling
          Makes 1 cup

          2 tablespoons olive oil
          2 Bratwurst Buffalo sausages, chopped
          1 small onion, chopped
          3/4 cup ricotta
          salt and pepper to taste
          1. Heat olive oil over medium high heat in a skillet. Add chopped onions, cooking until onions are translucent. Add chopped sausage and cook for 5 minutes, making sure to not overcook. 
          2. Remove from pan and reserve. 
          3. In a blender or using an immersion blender, puree ricotta cheese, onions, and cooked sausage. 
          4. Season with salt and pepper. Use to fill pasta. Read the link below on how to make pasta!
          Pasta Note: We made Domenica Marchetti's Fresh Egg Pasta recipe, which you can find here on Leite's Culinaria


          Want to try buffalo sausages? Enter the code VIRTUALPOTLUCK and receive 15% off any hot dog or sausage purchase through the end of March 2012.

          Check out their Facebook page and stay up to date on new promotions, recipes, and more!
          The Buffalo Guys Facebook Page


          Disclaimer: Buffalo Sausages were provided free of charge to review and develop this recipe with. Opinions, as always, are based on personal testing and tasting!

          Sunday, March 4, 2012

          Miracle Berry Tablets

          Miracle Berry? You might think I've gone crazy, but I swear these exist in natural form, as well as tablets! When I first discovered these in culinary school, I was attending a demonstration with the natural berries and was blown away. But first, let me tell you what they are.

          Native to the wet, tropical lowlands of West Africa, it was first documented by a french explorer during an excursion of West Africa in 1725. The plant can grow up to 20 feet in height in the wild, but normally stays under 10 feet when grown in cultivation.Harvested twice a year, these berries are sweet but flavorless and this is what makes then special: they contain an "active glycoprotein molecule with miraculin". When the flesh is consumed, the molecule binds to your tongue's taste buds cause bitter and sour fruits to taste sweet. Personally, the effect lasts about 20 minutes, but some people have reported it to last up to 2 hours.


          For example, after consuming the miracle berry or tablets, you suck on a lime. This lime will now taste to you as the sweetest and most delicious limeade ever. That's the mind blowing part. When you consume goat cheese, your taste buds are really tasting a smooth, sweet cheesecake. And beer? Beer tastes like a milkshake! I know, crazy!

          There are some health benefits to the miracle berry as well, but not reviewed by the FDA yet (but yes by the equal organization in Japan), so if you're interested in possibly learning more about how consuming miracle berries can help your health, head on over to this link and read "What The Sugar Industry And The FDA Don't Want You To Know!"


          This was my first time tasting Miracle Berry Tablets (and my husbands first time tasting anything Miracle Berry!), and you can see a few of the tastings we set up: limes, Sriracha, Hot Chili Paste, Blackberries, and Vegemite. Off camera, we also had: Goat cheese, 80% dark chocolate, pineapple slices, and a bottle of beer.

          Each and every ingredient changed completely under the miracle berry phase. Hot chili sauce was sweet, with a subdued heat; the blackberries where under-ripe and when tasted, they tasted like berries plucked fresh from the bush. Our favorite? Sucking on limes. My mouth waters just thinking about it. Of course, you want to take notice of what you're consuming and don't just suck on limes all day, your tummy might hurt!

          Want to order your own berries or tablets? Head on over to Miracle Berry Hut and stock up. It's a fun event to bring out at parties!


          Disclaimer: Miracle Berry Hut kindly sent me their tablets to test and no monetary compensation was exchanged. Opinions are (and always will be) 100% my own and based on my tasting.

          Thursday, March 1, 2012

          SoupaPalooza: Cream of Cauliflower

          Sometimes, all you need are a few ingredients to make a comforting and creamy soup that sticks to your ribs! This is what this soup is: rich, flavorful and so good for you! Sure, it has cream in it, but you can definitely substitute cream with almond milk, soy milk or even omit it all together and have a hearty cauliflower puree.

          Like I said, it's healthy for you and while researching why, I came across these health benefits of Cauliflower:
          • Very low in calories. 100 g of fresh cauliflower has only 26 calories. However, it is very low in fat and contains no cholesterol.
          • Its florets contain about 2 g of dietary fiber per 100 g; providing about 5% of recommended value.
          • Cauliflower contains several anti cancer phyto-chemicals like sulforaphaneand plant sterols such as indole-3-carbinolwhich appears to function as an anti-estrogen agent. Together these compounds have proven benefits against prostate, breast, cervical, colon, ovarian cancers by virtue of their cancer cell growth inhibition, cytotoxic effects on cancer cells.
          • Also,Di-indolyl-methane (DIM), a lipid soluble compound present abundantly in brassica group of vegetables has found effective as immune modulator, anti-bacterial and anti-viral compound by potentiating Interferon-Gamma receptors and its production. DIM has currently been found application in the treatment of recurring respiratory papillomatosis caused by the Human Papilloma Virus (HPV) and is in Phase III clinical trials for cervical dysplasia.
          • Fresh cauliflower is excellent source ofvitamin C; 100 g provides about 48.2 mg or 80% of daily recommended value. Vitamin-C is a proven antioxidant helps fight against harmful free radicals, boosts immunity and prevent from infections and cancers.
          • It contains good amounts of many essential B-complex group of vitamins such as folates, pantothenic acid (vitamin B5), pyridoxine (vitamin B6) and thiamin (vitamin B1), niacin (B3) as well as vitamin K. These vitamins are essential in the sense that body requires them from external sources to replenish and required for fat, protein and carbohydrates metabolism.
          • It is also good source of minerals such as manganese, copper, iron, calcium and potassium. Manganese is used in the body as a co-factor for the antioxidant enzyme superoxide dismutase. Potassiumis an important intracellular electrolyte helps counter the hypertension effects of sodium.


          Cream of Cauliflower
          Makes 2 quarts

          2 strips of bacon, diced
          1/2 yellow onion, diced
          2 stalks celery, chopped
          1 medium carrot, chopped
          1 head cauliflower, florets and stems
          4 cups broth (chicken, beef, vegetable)
          2 cups cream

          to taste: salt and black pepper
          garnish: cheese

          1.  Over high heat, render the fat from the bacon until halfway cooked and add onion, celery, and carrots. 
          2. Cook over medium heat from 4 minutes and then toss in cauliflower. Saute for 4 more minutes and quickly add broth of your choice. 
          3. Simmer until cauliflower is tender. Blend (using a regular blender or an immersion blender) until smooth.
          4. Strain into new pot and add cream. Add salt and pepper to taste.
          5. Serve alongside crusty bread or garnish with cheese. M. made a garnish of finely chopped apples and onions, cooked down to a sweet chutney-like texture.
          Come join SoupaPalooza at TidyMom and Dine & Dish 


          Remember to enter my two open giveaways, both ending on Sunday!